
Now that your Airflow environment is up and running, it’s time to enhance its scalability by switching from SQLite to PostgreSQL. The necessary adjustments involve replacing the SQLite database with PostgreSQL and changing the SequentialExecutor to LocalExecutor. In this section, we’ll guide you through the process of installing and configuring PostgreSQL, ensuring Airflow is ready for more complex and larger-scale workflows. Let’s dive into the steps needed to transition to a more robust database solution!
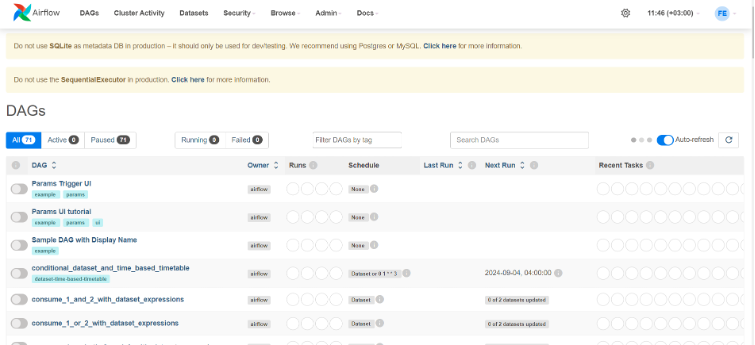
1. Upon logging into Airflow, you will encounter two warnings: one related to the database and the other concerning the executor.
By default, Airflow is configured to use SQLite as its database and SequentialExecutor as its execution method. The necessary adjustments involve replacing the SQLite database with PostgreSQL and changing the SequentialExecutor to LocalExecutor.
While the SequentialExecutor can only execute a single task at a time, the LocalExecutor enables the parallel execution of multiple tasks.
2. To replace the SQLite database with a PostgreSQL database, please follow the steps outlined below:
- Install the following library:
sudo apt-get install postgresql postgresql-contrib- Create a PostgreSQL database using the commands below:
Note: The usernames, passwords, and database names (e.g., airflow) provided here are for demonstration purposes. Please select a secure username and password.
sudo -u postgres psql
postgres=# CREATE USER airflow PASSWORD 'airflow';
CREATE ROLE
postgres=# CREATE DATABASE airflow_db;
CREATE DATABASE
postgres=# ALTER DATABASE airflow_db OWNER TO airflow;
ALTER DATABASE
postgres=# GRANT ALL PRIVILEGES ON ALL TABLES IN SCHEMA public TO airflow;
GRANT
- To enable the connection between Airflow and the PostgreSQL database, the following libraries must also be installed:
sudo apt install libpq-dev
pip install psycopg2
3. After the PostgreSQL database has been successfully established, access the configuration file located at airflow/airflow.cfg and modify the executor and connection string settings accordingly.

As indicated above, access the configuration file and modify the following setting:
executor = LocalExecutor
sql_alchemy_conn = postgresql+psycopg2://airflow:airflow@localhost:5432/airflow_db
- To ensure that the changes take effect in Airflow, the database must be initialized again:
airflow db init- The installation of Airflow has been successfully completed.
Over the course of this blog series, we have taken a deep dive into Apache Airflow and its setup. In Part 1, we explored what Apache Airflow is and how it can help manage complex business workflows with ease. In Part 2, we went through the step-by-step process of installing Airflow on an Ubuntu system, including setting up a virtual environment and configuring the Scheduler and Web Server. Finally, in Part 3, we upgraded Airflow’s functionality by switching from the default SQLite database to the more scalable PostgreSQL—a key step for running Airflow in production environments.
With Apache Airflow now installed, configured, and connected to PostgreSQL, you are well-equipped to manage and scale your workflows. Whether you’re handling data pipelines or managing intricate processes across multiple environments, Airflow’s flexibility and robust architecture will be invaluable. Stay tuned for future posts, where we’ll cover more advanced topics, including optimizing workflows, managing Airflow on the cloud, and integrating with other data tools. Happy workflow orchestration!